For today I will show you how I draw a Witch Hat and convert it to the Photoshop.
Open the Adobe Illustrator .
Rename the file as Hat
Use A4 size ( landscape)
Then click OK
Select the the Pen tool ( shortcut - P)
Draw a shape of hat on the A4 paper.
Select Gradient (shortcut --G) which is on your right side.
I adjust the gradient to blue color.
This is the hat after I draw and color on Illustrator.
Go to File >>> Save for Web & Devices ( shortcut -- Alt + Shift + Ctrl + S)
Save as PNG-24.
Open Adobe Photoshop and go to File >>> open.
Select the hat image and click OK
Rename the layer as hat and unlock it.
I had download the texture for the hat and I will combine them together.
Rename the layer as hat background and click OK.
Select Move tool ( shortcut - V)
Drag the texture to another file.
Select vivid light for the texture.
The texture is overlap to the hat. Press ctrl+ T to adjust the position of the texture.
Select the eraser tool (shortcut -- E )
Erase the part that you want to delete and left the hat image. ( be careful when you are erase)
You can reduce or enlarge the erase by pressing [ and ] in the keyboard.
Go to Adjustment >>> brightness/ contrast.
Then, go to color balance.
This is image after the editing.
Click all the layer ( hold ctrl ) and right click to select merge layers.
Save after you have done the work.
Drag it to the background file.
Right click on the hat layer and select duplicate layer.
Select the hat layer and go to Layer >>> Layer Style >>> Outer Glow
Adjust the size and the range .
Select another layer -- hat copy layer.
Go to Layer >>> Layer Style >>> Outer Glow
Reduce the size and the range because I want a neon effect on the outer line of the hat.
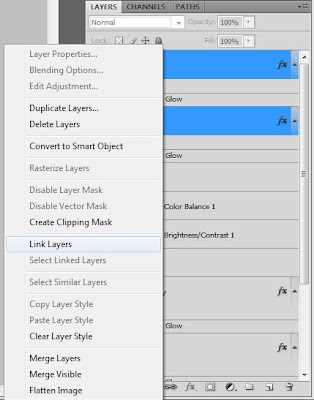
After finish adjustment, click on both layer ( hold ctrl ) and right click to select link layers. So that, all the layers of the hat will link together and easy you to do any transform.


No comments:
Post a Comment