
I had done my assignment 2 in Flash. As usual, I will show you all the steps how I created my 20sec video at below. If anythings that you confuse, you can leave your comment at here and I will reply it as soon as possible. Hope you can enjoy reading my Flash tutorial.


Choose the Flash File ( ActionScript 3.0)
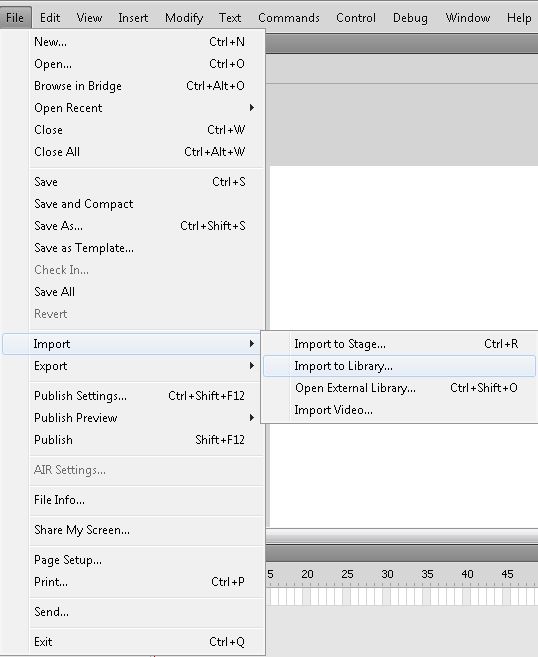
Go to File > Import >Import to Library

Choose the 1 Malaysia poster file that you had done it in assignment 1.

Select and import the layer one by one. (tick on the layer to import it)

Rename the each layer in library (ctrl +L) so that you will not confuse later on.

Go to the properties


Right click on the stage and select rulers

Drag a guide line so that easy you do differentiate.

Import a image that I had done in photoshop and make it as background

Select the text tool (shortcut -T )

I type the word "People 1st Achievement is main priority"
Press Q to transform it
Right click on the frame and select insert frame then right click again select create motion tween
Select the layer and go to modify > convert to symbol ( shortcut F8 )

Adjust to 0

You can follow my time frame as above that I had done for my text movement. I adjust the brightness to 100 in the end of the frame of the text.

I export the suara layer from the library (leaf shape)

Go to modify > convert to symbol (shortcut - F8)
To apply more effect and motion you must convert your image to symbol and select movie clip

Right click on the image of the layer and select break apart (maybe you need to repeat to break apart to the layer until it become net shape)

Select eraser tool ( shortcut - E)

Eraser a few part of the image then press F6 to insert keyframe until you finish eraser the whole image.

Right click on the time frame and select reverse frames. Thus you can get the effect of leaf glowing out

I import others leaves and repeat the same step as above.

This is the time frame when I done the leaves glowing effect.

Right click on the text layer and select copy frames

Click on the empty time frame
Right click and select paste frame

Right click again and select remove tween

Right click and select create motion tween
Now you can apply new motion tween .

Go to motion presets and select smoke effect

Adjust the direction of the smoke.

I had import the butterfly image (create using photoshop brush tool)

Go to modify > convert to symbol (shortcut -F8 )

Go to motion presets > smoke effect

Right click on the time frame of the butterfly and select reverse keyframes

Create the movement for the butterfly (drag it diagonally)
To make it more real, you can minimize the size of butterfly then resize back in different time frame so it will look like flying

Right click on the time frame and select copy frames

Paste on new layer
Resize it by press Q

Repeat same steps and change the direction of the butterfly flying.


This is the time frame I set for my background
You can press ctrl + enter to view in swf file

Right click and select the create motion tween

Go to properties > color effect> alpha
Adjust to 0

Adjust again the alpha to 100 follow the time frame above.

Import the background text in new layer.
Convert to symbol (shortcut - F8 ) and create motion tween.

Go to properties > color effect > alpha
Adjust to 0

Adjust back the alpha to 100.

Copy frames of the background layer and remove the tween.

Move up the background

Now import another image spiral in a new layer
Adjust the size by press Q

Go to properties > filters > adjust color

Adjust contrast to 20

Go to motion presets > smoke effect

Import another image in new layer which is leaf

Adjust the alpha to 0 and also the position of image make it move upward

Adjust back the alpha to 100

Import the hibiscus in new layer

Go to modify > break apart (ctrl +B)

Select the eraser tool (shortcut- E)
Erase the part of hibiscus and make a new frame

This is the time frame that I finish erase the hibiscus

Right click on the time frame and select reverse frame

Import the flower image in new layer and place the layer under the hibiscus layer (remember to convert it to symbol)
Go to properties adjust the bright to 100 so that the flower will become white color

Adjust back the bright to 0
The color will appear slowly

You can follow my time frame.

Import the title image in a new layer and convert to symbol

Go to modify > break apart (ctrl +B)

Select bone tool (shortcut - X)

Drag it horizontally on the title image.

Move the bone clockwise to the left

Put back the bone to the original place.
The title will appear.

Select the rectangle tool (shortcut -R)

Drag it on a new layer
Select the black color before you create rectangle shape
Convert it to symbol (shortcut -F8)

Go to properties > color effect > alpha
Adjust it to 0

Adjust back the alpha to 100
Import the poster in new layer and convert it to symbol
Go to properties > filters > bevel effect.
Action Script
When you export your video to swf file, the video will loop so to make it stop you need to use action script.

Open a new layer name as action script

Insert a keyframe at the last frame of your video and right click on the frame
Select Actions

Type - stop( ); in the empty space
then export your video again in swf file you will realize that the video wont repeat.
These are all the steps that how I done my assignment 2 in Adobe Flash.Remember to save it when you finished a part and backup your file to prevent it corrupted.
No comments:
Post a Comment