Here is my story board about my assignment 2. I had use my 1 Malaysia poster as main concept to create 20second short video.I do some reference via website to get some ideas. Before I start doing assignment 2 , I would to ask about your opinion based on my story. I will create this video by using Adobe Flash and this is my 1st time using Adobe Flash. Anywhere, I will try my best to know about it as well as produce a good work.
Monday, April 4, 2011
Thursday, March 31, 2011
keyboard ShortCUTs
Tools
A - Arrow/Curso
T- Text Tool
P - Pencil
I - Ink Bottle
B - Paint Brush
U - Paint Bucket
E - Eraser
D - Dropper
M - Magnifier
L - Lasso
T- Text Tool
P - Pencil
I - Ink Bottle
B - Paint Brush
U - Paint Bucket
E - Eraser
D - Dropper
M - Magnifier
L - Lasso
Frames
F5 - Add frame
Shift F5 - Delete Frame
F6 - Add Key Frame
F7 - Add Blank Key Frame
F8 - Make Symbol
Shift F5 - Delete Frame
F6 - Add Key Frame
F7 - Add Blank Key Frame
F8 - Make Symbol
Timeline
Enter - Play
Command/Control 0 (zero) - Rewind
< - Previous Frame
> - Next Frame
Home - Goto First Scene
End - Goto Last Scene
Page Up - Goto Previous Scene
Page Down - Goto Next Scene
Command/Control 0 (zero) - Rewind
< - Previous Frame
> - Next Frame
Home - Goto First Scene
End - Goto Last Scene
Page Up - Goto Previous Scene
Page Down - Goto Next Scene
File
Command/Control R - Import Image/Sound/etc...
Command/Control Shift R - Export to .swf/.spl/.gif/etc...
Command/Control Shift O - Open as Library
Command/Control Shift R - Export to .swf/.spl/.gif/etc...
Command/Control Shift O - Open as Library
View
Command/Control 1 - View movie at 100% size
Command/Control 2 - Show Frame
Command/Control 3 - Show All
Command/Control 2 - Show Frame
Command/Control 3 - Show All
Windows
Command/Control L - Show/Hide Library
Command/Control M - Modify Movie Properties
Command/Control E - Toggle between Edit Movie& Edit Symbol Mode
Command/Control Shift L - Show/Hide Timeline
Command/Control Shift W - Show/Hide Work Area
Command/Control M - Modify Movie Properties
Command/Control E - Toggle between Edit Movie& Edit Symbol Mode
Command/Control Shift L - Show/Hide Timeline
Command/Control Shift W - Show/Hide Work Area
Modifying and editing
Command/Control G - Group
Command/Control U - Ungroup
Command/Control B - Break Apart
Command/Control Shift V - Paste in Place
Command/Control D - Duplicate
Command/Control A - Select All
Command/Control Shift A - Deselect All
Command/Control Shift O - Optimize Curves
Command/Control K - Align Window
Command/Control Shift S - Scale and Rotate
Command/Control Shift Z - Remove Transform
Command/Control Up Arrow - Move Ahead
Command/Control Down Arrow - Move Behind
Command/Control Shift Up Arrow - Bring to Front
Command/Control Shift Down Arrow - Send to Back
Command/Control T - Modify Font
Command/Control Shift T - Modify Paragraph
Command/Control left Arrow - Narrower Letter Spacing (kerning)
Command/Control right Arrow - wider Letter Spacing (kerning)
Command/Control U - Ungroup
Command/Control B - Break Apart
Command/Control Shift V - Paste in Place
Command/Control D - Duplicate
Command/Control A - Select All
Command/Control Shift A - Deselect All
Command/Control Shift O - Optimize Curves
Command/Control K - Align Window
Command/Control Shift S - Scale and Rotate
Command/Control Shift Z - Remove Transform
Command/Control Up Arrow - Move Ahead
Command/Control Down Arrow - Move Behind
Command/Control Shift Up Arrow - Bring to Front
Command/Control Shift Down Arrow - Send to Back
Command/Control T - Modify Font
Command/Control Shift T - Modify Paragraph
Command/Control left Arrow - Narrower Letter Spacing (kerning)
Command/Control right Arrow - wider Letter Spacing (kerning)
For more information you can visit these website http://appletree.or.kr/quick_reference_cards/adobe/FlashCS4_OSX_Shortcuts.pdf
Sunday, March 27, 2011
Introduction -- ADOBE FLASH
Hi, everyone.......today I want to introduce about the Adobe Flash to you all. I had learned about Flash in this semester and I 'm using Adobe Flash CS4 currently. I also very interested in using flash because it can be use to create an animation. Now I will explain to you what is Flash?
![]() |
| Adobe Flash CS4 |
This introductory training is tailored specifically to the needs of a beginner or intermediate user of Adobe Flash CS4. During the course you will learn how to create, animate and efficiently mange your rich media content via the brand new CS4 interface. You will understand how to correctly implement features like the new motion tween, motion presets, ActionScript 3 event handling and how to professionally set up your site.
By the time you have completed Total Training for Adobe Flash CS4 Professional: Essentials you will have the confidence, experience and tools to effectively utilize flash when constructing your own rich media websites, create eye-catching flash banner advertisements, incorporate sound and video and publish your site.
To get more clearly information about the Flash you can go to this website : http://a248.e.akamai.net/f/248/3214/1d/www.zones.com/images/pdf/adobe_flashpro_cs4_whatsnew.pdf
Tuesday, March 8, 2011
1 Malaysia poster -- clothes
HERE........I had done my 1 Malaysia poster with the theme of clothes. Actually there are a bit different compare with my sketches after I done some improvement but I still maintain the idea. I use the" People 1st ,achievement is main priority" as my quotation in my poster. As you can see the background of the poster I arrange 3 language which is Malay, Chinese and Tamil. This also represent 3 main races in Malaysia - Malay Chinese India , we united together and live in one society. Other than that, I use "Batik" as my clothes in the poster and I also arrange the word inside the batik. Hope this poster can bring out 1 Malaysia meaning for everyone.
Below I will share my all steps how I finish my poster.
I use Adobe Illustrator CS4 to create my poster
Open the Illustrator
Name it 1 malaysia poster
Size : A4 ( potrait)
Color mode : RGB 72ppi -- for screen

Repeat the step tracing follow the shape of the leaves.
I use Adobe Illustrator CS4 to create my poster
Open the Illustrator
Name it 1 malaysia poster
Size : A4 ( potrait)
Color mode : RGB 72ppi -- for screen
Go to File >>> Place
Choose the sketch image that I had scan by using printer before I start create my poster.
Ctrl + T transform the image to fix the A4 paper after you import it
Select Pen Tool (shortcut -- P)
Double click on the layer and name it as original image ( lock it)
Create a another layer name it as flower
Follow the outline of the flower and trace it by using pen tool

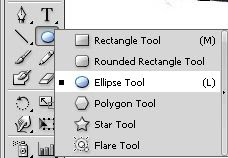
Select Ellipse tool ( shortcut -- L)
Draw the circle inside the flower ( press shift when you drag the circle)
After you trace finish all the flower, open another layer and name it leaf
Repeat the step tracing follow the shape of the leaves.
Create a layer name it as cloth
Here is the image after finish tracing
Select Gradient tool ( shortcut --G)
Change the color of the gradient
R 255
G 84
B 0
R 255
G 209
B 0
I had adjust the angle of the gradient to 60degress
Press ctrl to select another flower
After that, select the leaf and apply gradient
Color all the leaves by repeat the step above
Select spiral tool
Change the stroke to 4pt
I create the spiral to fill up the empty space of the clothes.
I change the flower outline to white color.
I also change the stroke of the line to 3 pt
I change all the flower and the leaf outline to white color
Go to effect >>> stylize >>> drop shadow
This is the poster after drop shadow
Select rectangle tool (shortcut -- M )
Create a new layer name it background and drag the mouse diagonally on the A4 paper
Change the gradient as
R 0
G 0
B 66
R 255
G 0
B 122
Go to effect >> artistic >> watercolor
Adjust the brush detail to 7 and the texture to 1
Effect >> artistic >> paint daubs
Adjust the sharpness to 10
This is almost done half process of my poster.
Select type tool ( shortcut --T ) and create a new layer name it tamil
Adjust the opacity of the font to 52
Change the character of the font to 黑体
Type the font in a new layer name as Chinese. Right click on the font and select create outline
Right click again and selected ungroup. Now you can move or transform the font freely. I change all the font color to white color and also use the same opacity
Open a new layer and name as title
I use the People 1st achievement is main priority as my quotation.
Create a new layer name it as bangsa
Ctrl + Alt to duplicate the word
Arrange the word bangsa to fill up the image of flower.
Do it for each hibiscus by putting the word irama nada suara and priority.
Select all the word inside the flower and go to window >>> transpanrency ( ctrl +shift +f10)
Select overly
File >>> export
Save as photoshop (psd )
Color model: RGB
Resolution : screen (72 ppi )
I save my poster as psd file because all the layers will transfer to photoshop and I wont lose any layers when I do the editting.
Now open the Adobe photoshop CS4
Selected crop tool (shortcut --C)
Crop the extra part of the poster
Thus, it can be fix on A4 paper.
Select title layer and right click
Select duplicate layer
Right click on the new title layer and select blending options
Select outer glow
Select the pink color ( ffc5f3 )
Adjust the fill to 0%
So you can the title with the pink color outline.
Go to adjustment
brightness 10
contrast 62
Adjust the saturation to +5
DONE....thats all about the steps when I create my poster.
Hope you can learn something from my tutorial.
Subscribe to:
Posts (Atom)